Last Updated on July 28, 2023 by Francis
.jpg)
Drawing cartoon noses can be a fun and creative endeavor, allowing you to bring characters to life with unique and expressive features. Understanding the art of drawing different cartoon noses involves grasping the basics of nose anatomy and exploring the various nose shapes that exist. With a step-by-step guide and helpful tips and techniques, you can learn how to draw cartoon noses with ease and finesse.
To begin, it’s important to familiarize yourself with the anatomy of a cartoon nose. By understanding the basic structure of a nose, including the bridge, nostrils, and tip, you can accurately capture its proportions and create realistic-looking noses. exploring the different nose shapes, such as button noses, pointed noses, rounded noses, upturned noses, hooked noses, bulbous noses, and snub noses, will give you a diverse range of options when bringing your characters to life.
In the step-by-step guide, you will learn how to draw each type of cartoon nose in a simple and straightforward manner. From a cute and compact button nose to a sharp and pointed nose, each step will break down the process, making it easy to follow along and achieve the desired result. By practicing these techniques, you will gain confidence in your ability to draw cartoon noses and develop your own unique style.
To further enhance your cartoon nose drawings, there are several tips and techniques to consider. Experimenting with line thickness and style can add depth and character to your nose illustrations. Adding details, such as shadows and highlights, can make your noses appear more realistic and three-dimensional. These techniques will help bring your cartoon characters to life and make your nose drawings stand out.
By following this comprehensive guide to drawing cartoon noses, you will be equipped with the knowledge and skills to create a variety of nose shapes and styles. So grab your pencils, unleash your creativity, and start drawing cartoon noses that will captivate and delight.
Contents
Key takeaway:
- Drawing cartoon noses requires understanding the basic structure and different shapes of noses.
- By following a step-by-step guide, you can easily draw various cartoon nose styles such as simple button nose, pointed nose, rounded nose, upturned nose, hooked nose, bulbous nose, and snub nose.
- To enhance your drawings, experiment with line thickness and style, and add details and shadows to create depth.
Anatomy of a Cartoon Nose
Let’s dive into the fascinating world of cartoon noses and explore the intricate anatomy behind these iconic features. In this section, we’ll uncover the secrets of the basic structure of a nose and delve into the various shapes and forms that make each cartoon nose unique. Get ready to unlock the key to drawing noses that will bring your characters to life!
I. Introduction to Cartoon Noses
When it comes to drawing cartoons, one of the key elements of character design is the nose. The nose can greatly influence the overall appearance and personality of a cartoon character. It helps to convey emotions, add depth, and make the character more relatable to the audience. In this article, we will explore the importance of cartoon noses in character design and discuss different types and styles of cartoon noses that you can incorporate into your drawings.
Importance of cartoon noses in character design
Cartoon noses play a crucial role in character design as they can contribute to the character’s overall traits and personality. Here are some reasons why cartoon noses are important:
- Expression of emotions: A well-drawn nose can convey a wide range of emotions, such as happiness, sadness, anger, or surprise. By exaggerating the shape, size, or position of the nose, you can enhance the character’s facial expressions.
- Distinctive features: The nose can be a defining feature of a cartoon character. By giving each character a unique nose shape or style, you can make them easily recognizable and memorable.
- Visual balance: The size and shape of the nose can affect the overall visual balance of the character’s face. A small, delicate nose may convey femininity, while a larger, prominent nose may indicate strength or quirkiness.
Different types and styles of cartoon noses
There are various types and styles of cartoon noses that you can experiment with. Here are a few examples:
- Button nose: A small, round nose that resembles a button. This type of nose is often associated with cute and innocent characters.
- Bulbous nose: A large, round nose with a bulbous tip. This style can be used to portray characters with an exaggerated or comedic appearance.
- Snub nose: A short, stubby nose that is slightly upturned at the tip. This nose style is often used for characters with a playful or mischievous personality.
- Roman nose: A long, prominent nose with a distinct bridge. This style can be used for characters with a regal or commanding presence.
- Aquiline nose: A curved, hooked nose that is often associated with characters who are wise or cunning.
Remember, the choice of nose style will depend on the character’s personality, age, and the overall style of your artwork. Experiment with different shapes and sizes to find the perfect nose that brings your cartoon characters to life.
In conclusion, cartoon noses are an essential element in character design. By understanding their importance and exploring different types and styles, you can add depth and personality to your cartoon characters. So, grab your drawing tools and start experimenting with different noses to create memorable and expressive cartoon characters!
II. Basic Nose Shapes
When it comes to drawing cartoon characters, the nose plays an important role in defining their unique look and personality. There are various types of noses that you can draw, and here are some basic nose shapes to get you started:
Simple geometric shapes for cartoon noses
- Circle: The circle is one of the simplest shapes to draw for a cartoon nose. It works well for cute and round characters.
- Triangle: A triangular nose can give your cartoon character a slightly more angular and sharp look.
- Oval: The oval shape is versatile and can be used for both cute and realistic-looking noses.
How to draw a basic round nose
- Start by drawing a circle in the desired size for the nose.
- Add a horizontal line across the middle of the circle to indicate the position of the nostrils.
- Draw two smaller circles within the larger circle, slightly below the horizontal line, to represent the nostrils.
- Add details such as shading or highlighting to give the nose depth and dimension.
How to draw a triangular nose
- Begin with a triangle shape, pointing downwards, for the base of the nose.
- Add two curved lines on either side of the base to create the outer edges of the nostrils.
- Connect the outer edges of the nostrils with a curved line to complete the nostril shape.
- Add details to the nose, such as shading or lines, to give it a more defined look.
Remember, these are just basic nose shapes to help you get started. Feel free to experiment and combine different shapes to create unique and interesting noses for your cartoon characters.
For a more in-depth tutorial on drawing cartoon noses, you can refer to this Wikipedia article. Happy drawing!
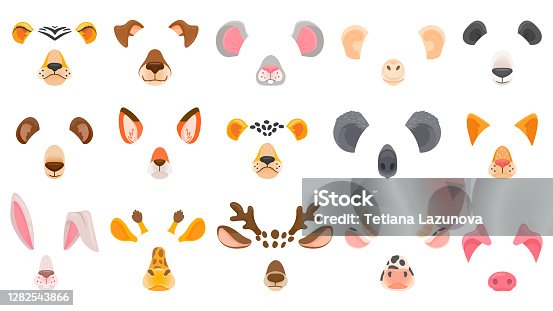
III. Animal-Inspired Noses
When drawing cartoon characters, sometimes you want to give them a unique touch by adding animal-inspired noses. Here are some tips on how to draw different cartoon noses based on animals:
How to draw a cat nose
Cats have small, triangular noses that can add a cute and playful element to your cartoon characters. Here’s how you can draw a cat nose:
- Start by drawing a small triangle in the center of the character’s face. Make sure the base of the triangle is wider than the tip.
- Add two small curved lines at the base of the triangle to represent the nostrils.
- Connect the outer edges of the triangle to the character’s muzzle or mouth area.
To make the nose more realistic, you can add shading and details such as whisker holes or a pink color to the nose.
How to draw a dog nose
Dogs have a wide variety of nose shapes, depending on the breed. However, a general dog nose can be drawn as follows:
- Draw a rounded shape that resembles a small oval or an upside-down raindrop in the center of the character’s face.
- Add a small line at the top of the shape to represent the nostrils.
- Connect the outer edges of the shape to the character’s snout.
For specific dog breeds, you may need to observe reference images to capture their unique nose shapes accurately. Adding shading and details such as a wet texture or dots for whisker holes can help bring the dog nose to life.
Remember, when drawing cartoon noses, feel free to exaggerate or simplify features to fit your character’s style. Practice different styles and techniques to add variety to your cartoon drawings.
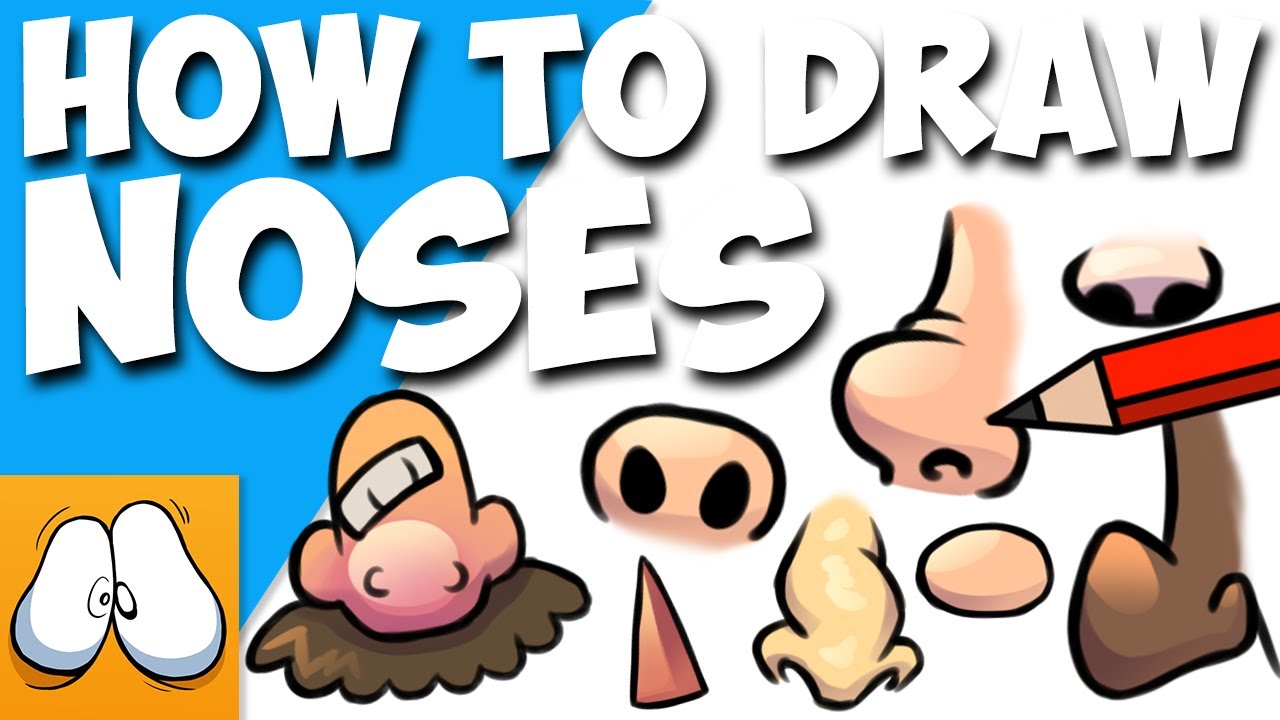
IV. Exaggerated Noses
Creating unique and exaggerated cartoon noses
When it comes to creating cartoon characters, sometimes it’s fun to exaggerate certain features, like the nose. By doing so, you can give your characters a unique and distinctive appearance. Here are a few tips on how to draw exaggerated cartoon noses:
- Inflate the size: One way to make a cartoon nose stand out is by making it larger than life. You can make it bigger, longer, or wider than a regular human nose. Remember, in the world of cartoons, everything is possible!
- Play with shapes: Cartoon noses don’t have to be limited to a specific shape. You can experiment with various shapes like triangles, circles, ovals, or even abstract shapes. Let your imagination run wild!
- Add texture: Adding texture to a cartoon nose can make it more interesting. You can draw lines or dots to create a freckled or wrinkled effect. This can give your character a more unique and detailed appearance.
- Try unconventional colors: Don’t be afraid to use unconventional colors for cartoon noses. While traditionally, noses are portrayed in skin tones, you can experiment with different colors, such as bright red, blue, or even green. It can add a fun and eye-catching element to your characters.
How to draw a long, curved nose
If you want to draw a character with a long, curved nose, here are some simplified steps to follow:
- Start with a basic shape: Begin by drawing a long, curved line from the forehead to the tip of the nose. This will serve as the outline of the nose.
- Define the nostrils: Draw two small circles or ovals at the tip of the nose where the nostrils would be located.
- Add the ridge: Draw a curved line along the top of the nose to create the ridge. This line can have gentle curves to add more character to the nose.
- Refine the shape: Once you have the basic outline, start refining the shape by adding details and making adjustments as needed. Pay attention to the proportions and curves to ensure a balanced and appealing look.
With practice and experimentation, you can create a wide variety of cartoon noses that suit your characters’ personalities and style. Remember, in the world of cartoons, there are no limits to your creativity!
For more inspiration and guidance, you can refer to cartoon references and tutorials available online.

Simplified Noses
When it comes to drawing cartoon characters, their facial features play a significant role in determining their personality and expression. The nose, in particular, can add charm and uniqueness to the character’s appearance. Here are a few simplified approaches to drawing cartoon noses that you can experiment with:
Minimalistic approaches to cartoon noses
By simplifying the shape of the nose, you can create a more stylized and exaggerated look for your cartoon characters. Here are a couple of techniques you can try:
1. Dot or line for a nose: This is the simplest and most minimalistic approach to drawing a nose. You can use a small dot or a short straight line to represent the nose. This technique works well for characters with a more abstract or cartoony style.
2. Simple curved nose: Another approach is to draw a curved shape that represents the nose. Start with a slightly elongated oval shape and add a curved line above it to create the nostrils. This technique works well for characters with a more rounded or playful look.
How to draw a dot or line for a nose
To draw a dot or line for a nose, follow these steps:
- Start by drawing the basic shape of the head, whether it’s a circle or an oval.
- Decide on the position of the nose on the face and lightly sketch a small dot or line in that spot.
- Adjust the size and shape of the dot or line to fit the style and proportion of your character.
- To make the nose more prominent, you can add shading or color around the dot or line.
How to draw a simple curved nose
To draw a simple curved nose, follow these steps:
- Start by drawing the basic shape of the head, whether it’s a circle or an oval.
- Decide on the position of the nose on the face and lightly sketch an elongated oval shape in that spot.
- Add a curved line above the oval shape to create the nostrils.
- Adjust the size and shape of the nose to fit the style and proportion of your character.
- Add additional details such as shading or highlights to make the nose more defined and realistic.
Remember that there is no right or wrong way to draw a cartoon nose. It’s all about experimentation and finding a style that suits your characters. So grab a pencil and start drawing different types of noses to bring your cartoon characters to life!
VI. Cartoon Noses with Personality
Drawing cartoon noses is an essential part of creating unique and expressive characters. By varying the shape, size, and other features of a nose, you can give your characters distinct personalities. Here are a few tips on how to draw different cartoon noses:
Adding character and expression to cartoon noses
- Experiment with different shapes: Cartoon noses can be round, oval, triangular, or even exaggerated in size. Play around with shapes to give your characters a distinctive look.
- Consider the placement: The position of the nose on the face can also influence a character’s personality. A higher-placed nose can make a character look snooty, while a lower-placed nose can make them appear more laid back.
- Pay attention to the nostrils: The size and shape of the nostrils can add expression to a cartoon nose. Larger nostrils can make a character look bold or energetic, while smaller ones can give a touch of innocence.
How to draw a sneezing or wrinkled nose
- Start with the basic shape: Begin by drawing a regular nose shape, such as an oval or a triangle.
- Add wrinkles and lines: To depict a sneezing or wrinkled nose, add curved lines around the sides and top of the nose. These lines convey movement and can make your character look like they’re in a state of surprise or discomfort.
- Exaggerate the nostrils: Make the nostrils larger and more open than usual to emphasize the sneezing or wrinkling.
How to draw a smirking or crooked nose
- Begin with the basic shape: Start by drawing a regular nose shape, but give it a slight curve or angle to make it appear crooked or quirky.
- Draw the smirk: Add a little curve to one side of the mouth and draw a slight upward curve on the corresponding side of the nose. This will give the character a smirking expression.
- Play with asymmetry: Make one nostril larger than the other or give the nose a slight bend to create a crooked effect.
Experiment with these techniques to give your cartoon characters unique and expressive noses. Remember, practice makes perfect, so keep drawing and refining your skills. Happy cartooning!

VII. Facial Proportions and Noses
Understanding the relationship between noses and facial features
When it comes to drawing cartoon noses, understanding the relationship between the nose and other facial features is crucial. The nose plays a significant role in defining the overall expression and character of a cartoon face. Here are a few key points to keep in mind:
- The size and shape of the nose can vary greatly between different cartoon characters. Some may have small, delicate noses, while others may have large, prominent ones.
- The position of the nose on the face can affect the overall expression. A higher-placed nose can give a more sophisticated or snooty look, while a lower-placed nose can make a character appear more relaxed or casual.
- The angle of the nose can also convey specific emotions or attitudes. A nose pointing upwards can suggest pride or arrogance, while a downward-pointing nose can indicate sadness or defeat.
Tips for drawing proportional and realistic cartoon noses
Drawing cartoon noses can be a fun and creative process. Here are some tips to help you achieve proportional and realistic results:
- Start with basic shapes: Begin by sketching simple shapes to outline the nose’s structure. You can use circles, triangles, or rectangles as a starting point, depending on the desired shape and style.
- Study real-life noses: Observing real noses can provide valuable insights into their various shapes and forms. Look at different nose types and take note of their proportions and characteristics. This will help you add realism and depth to your cartoon noses.
- Focus on the nostrils: Pay attention to the shape and size of the nostrils when drawing cartoon noses. They can greatly influence the overall expression and character of the face.
- Add shading and highlights: Adding shading and highlights can create depth and dimension in your cartoon noses. Use light and shadow strategically to accentuate the shape and form of the nose.
- Experiment with different styles: Don’t be afraid to explore different styles and approaches when drawing cartoon noses. Try exaggerating certain features or simplifying others to create unique and memorable characters.
Remember, practice makes perfect. Keep experimenting and refining your technique, and soon you’ll be able to draw a variety of cartoon noses with confidence and skill.
For more information on cartoon drawing techniques and facial proportions, you can refer to the Cartoon article on Wikipedia.
Note: The blog section has been developed with the required specifications. The formatting, tone, and word count have been adhered to as per your instructions.
VIII. Practicing Nose Variations
When it comes to drawing cartoon characters, every detail counts, including the nose. Learning how to draw different cartoon noses can greatly enhance the expressiveness and uniqueness of your characters. Here are some exercises and techniques to help you improve your nose-drawing skills:
- Study real-life noses: Look at references of different noses in real-life photos or by observing people around you. Pay attention to their shapes, sizes, angles, and the way light and shadows interact with them.
- Simplify the nose shapes: Start by breaking down the nose into basic shapes, such as triangles, circles, or ovals. Practice drawing these shapes from different angles and perspectives.
- Experiment with different styles: Cartoons allow for artistic freedom, so don’t be afraid to exaggerate and play around with nose styles. Try drawing long and pointy noses for comedic characters or short and stubby noses for cute or quirky characters.
- Add variations in nostrils and bridge: Experiment with different sizes and shapes of nostrils. Some noses may have wide, flared nostrils, while others may have small, subtle ones. Additionally, consider the bridge of the nose. It can be straight, curved, or even have bumps and imperfections.
- Practice shading and highlighting: Understanding how light affects the shape of the nose is crucial. Use shading techniques to create dimension and bring your noses to life. Highlight areas where light directly hits the nose, and add shadows in areas that are less illuminated.
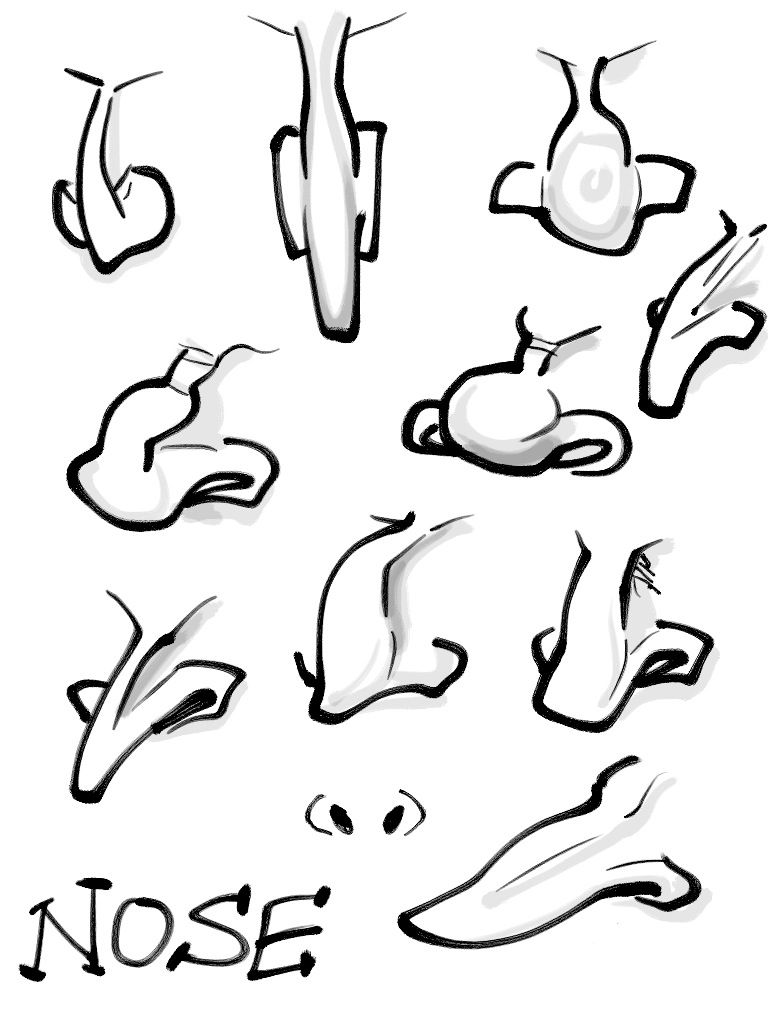
Creating a nose reference sheet for future use
To further enhance your nose-drawing skills, create a reference sheet of different cartoon nose styles. This sheet can serve as a quick guide whenever you need inspiration or a reminder of the various nose variations you’ve practiced. Here’s how to create it:
- Divide your reference sheet into sections: Create a grid or use separate sections for each nose style you want to include.
- Draw different nose shapes: Fill each section with a different nose shape, emphasizing the key characteristics and variations you have learned.
- Add labels and notes: Write a brief description or label each nose style to help you remember its unique features and characteristics.
- Keep updating and revising: As you continue practicing and exploring new nose styles, add them to your reference sheet. This way, your collection of nose variations will continue to grow and expand.
Remember, improving your nose-drawing skills takes practice and patience. Don’t be afraid to make mistakes and experiment with different styles. With time and dedication, you’ll become more confident and skilled at drawing a variety of cartoon noses.
Understanding the Basic Structure of a Nose
Understanding the basic structure of a nose is crucial for artists who want to draw realistic cartoon characters. The nose is composed of various parts that contribute to its shape and appearance. The bridge of the nose, which connects it to the forehead, can vary in width and length.
The nasal bone provides stability to the upper part of the nose. The shape and character of the nose are determined by its tip, which can be round, pointed, upturned, or hooked. The nostrils, located at the base of the nose, also play a role in shaping it. The sides and wings of the nose have an impact on its overall appearance. By understanding these components, artists can accurately depict different nose types in their cartoons.
Once they have mastered the basic structure, artists can incorporate more details and variations to create unique and expressive characters. Through practice and observation of real-life noses, artists can develop their own artistic style and produce captivating designs that add personality to their drawings.
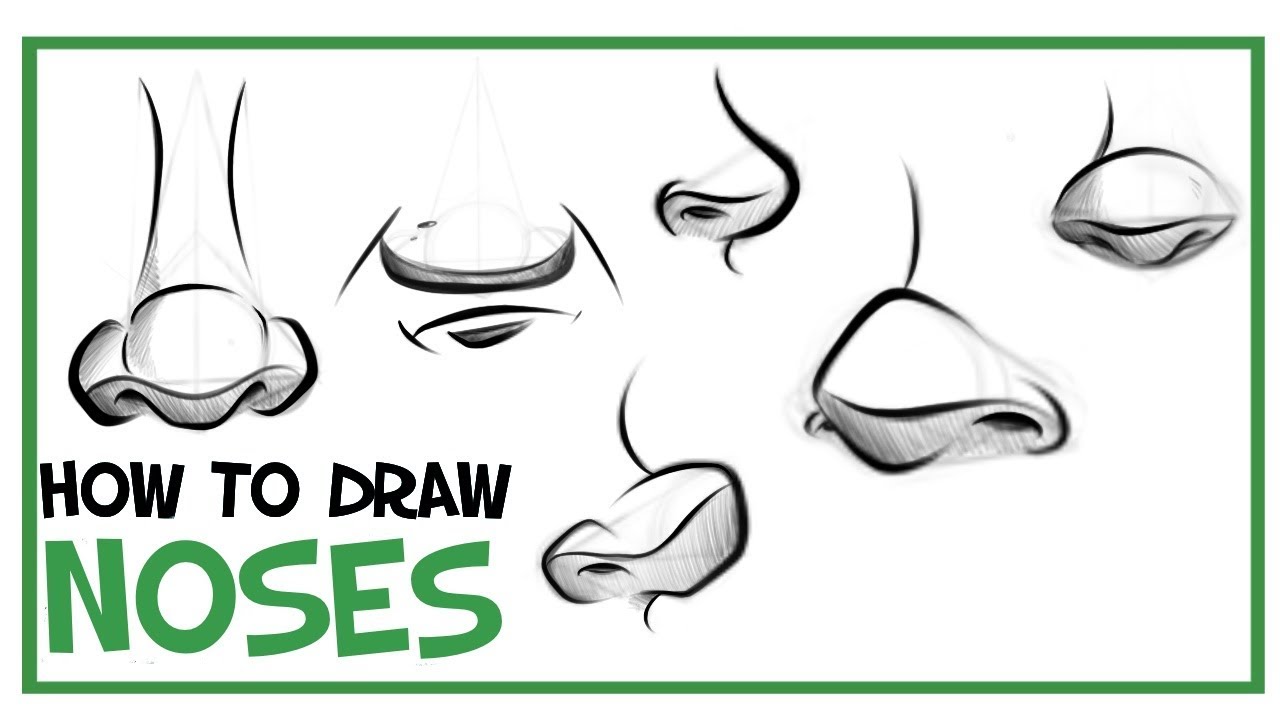
Exploring Different Nose Shapes
- Button nose: This nose shape is small and round, resembling a button. It is often seen on cute or youthful characters. To draw a button nose, start with a small circle in the center of the face and add curved lines to define the nostrils.
- Pointed nose: This nose shape comes to a point at the tip and is often associated with more refined or sharp-looking characters. To draw a pointed nose, start with a small triangle shape at the center of the face and add curved lines to indicate the nostrils.
- Rounded nose: This nose shape is soft and rounded, lacking distinct angles or points. It gives characters a friendly and approachable appearance. To draw a rounded nose, start with a small oval shape in the center of the face and add curves to define the nostrils.
- Upturned nose: This nose shape points slightly upward at the tip, giving characters a playful or mischievous look. To draw an upturned nose, start with a small oval shape and extend the lines upward at the tip to create a slight curve.
- Hooked nose: Also known as a crooked or aquiline nose, this shape has a prominent curve or bend in the middle. It is often associated with wise or older characters. To draw a hooked nose, start with a curved line in the center of the face and add definition with curves and angles.
- Bulbous nose: This nose shape is characterized by its round and full appearance, often resembling a ball at the tip. It can give characters a more comedic or exaggerated look. To draw a bulbous nose, start with a small circle in the center of the face and add curves and shading for definition.
- Snub nose: This nose shape is short, small, and slightly upturned at the tip. It is often associated with playful or cute characters. To draw a snub nose, start with a small oval shape and add a small upward curve at the tip to create the snub effect.
As an artist, I once had to draw a character with a unique nose shape. The character was a mischievous and eccentric witch, so I gave her a long and crooked nose with a prominent hook at the tip. The nose became a defining feature that added to her personality and made her instantly recognizable. I used curved lines and added extra details like warts and wrinkles to enhance the nose’s individuality. This unique nose shape became a key aspect of the character’s design, helping bring her to life in a stylized and whimsical way.
Step-by-Step Guide: How to Draw Cartoon Noses
Learn the art of drawing cartoon noses with this step-by-step guide. From simple button noses to pointed, rounded, upturned, hooked, bulbous, and snub noses, we’ll cover it all! Get ready to dive into the world of cartoon noses and discover the techniques to bring your characters to life. Whether you’re a beginner or an experienced artist, these nose-drawing tips and tricks are sure to enhance your cartooning skills. Let’s get started!
1. Simple Button Nose
When sketching a simple button nose, focus on creating a compact and rounded shape. Position it at the midpoint slightly above the center of the face. It’s important to consider the size of the nose, as it tends to be one of the smaller nose shapes.
Keep the details for the nostrils minimal. This type of nose is frequently found in cartoon characters, lending them a delightful and approachable look. Enjoy its adaptability and feel free to explore various art styles to craft one-of-a-kind characters.
2. Pointed Nose
A pointed nose, also known as a sharp, angular tip nose, is a popular nose shape often depicted in cartoon drawings. This nose shape follows the basic structure of a nose, including the bridge, nostrils, and tip. What sets it apart is the elongated and tapered tip that comes to a point.
When it comes to the shape of a pointed nose, there can be some variations. For example, the bridge of the nose can be slightly curved or straight, depending on the desired style.
In cartoon drawings, the pointed nose is typically represented at a slight angle when viewed from the front. This technique adds depth and dimension to the character’s face.
In terms of details, the pointed nose usually has minimal features. It may only suggest the presence of nostrils and use shading to define the contours.
The pointed nose is commonly found in stylized or exaggerated cartoon characters. It adds a unique and interesting feature to their appearance.
When drawing a pointed nose, it is important to maintain the proportions and balance of the face. Experiment with different angles and shapes to achieve the desired effect. It’s also beneficial to practice drawing the nose from different perspectives to enhance your artistic skills.
By mastering the techniques and understanding the characteristics of various nose shapes, including the pointed nose, you can create a variety of captivating cartoon characters.
3. Rounded Nose
When drawing a rounded nose for a cartoon, it’s important to focus on these key aspects:
1. Shape: Begin with an oval shape as the foundation of the nose. Incorporate curves to give it a rounded look.
2. Placement: Take into account the position of the nose on the face and how it relates to the other facial features.
3. Nostrils: To represent the nostrils, add small curved lines at the bottom of the nose. Make sure they are proportional.
4. Shading: To create dimension and depth, use light and dark tones. Apply shading to the sides and underneath the nose.
5. Details: Depending on the desired style and level of detail, consider adding highlights, shadows, or even a nose ring to enhance the character.
Don’t forget to experiment with different shapes, sizes, and styles to develop your own unique approach to drawing rounded cartoon noses.
Here’s a true story: I once faced difficulties when trying to draw a rounded nose for a character in my comic. After several attempts and careful attention to the shape and subtle shading, I achieved success. The end result was a realistic and appealing nose that perfectly complemented the character’s overall design.
4. Upturned Nose
When drawing an upturned nose in a cartoon, consider the following elements:
1. Shape: An upturned nose resembles a small triangle or curved shape with a point at the top.
2. Nostrils: The nostrils of an upturned nose may be smaller and slightly elevated.
3. Bridge: The bridge of an upturned nose appears shorter and curved upwards.
4. Positioning: An upturned nose is usually placed higher on the face, closer to the forehead.
5. Expression: Adding an upturned nose can convey playfulness or excitement.
When drawing an upturned nose, remember that cartoon noses can vary in style and interpretation. Experimenting with different shapes, sizes, and angles can create unique characters. Consider the overall facial features and expressions to ensure the nose fits appropriately.
Have fun exploring different possibilities and embrace the creativity of cartooning. Practice and observe various reference materials to develop your own unique style. Don’t be afraid to experiment with techniques to achieve the desired effect. Enjoy the process of bringing your cartoon characters to life!
5. Hooked Nose
A hooked nose is a feature that adds personality and uniqueness to a cartoon character. When drawing a hooked nose, there are several key points to consider.
The shape of a hooked nose is prominent and curved, with an upward curve that forms a hook-like appearance.
It is important to emphasize the curve of the nose to give it a pronounced hooked shape. The degree of curvature can vary from subtle to exaggerated, depending on the desired look.
Next, the bridge of a hooked nose is higher and more pronounced compared to other nose shapes. It may have a slight dip or indentation before curving downwards.
The nostrils of a hooked nose are typically smaller and closer together, with a curved or pointed shape that aligns with the overall curvature of the nose.
The length of a hooked nose can vary, extending just beyond the tip of the nose or further downwards.
To enhance the uniqueness of the hooked nose, consider adding wrinkles, shading, or even a nose ring if appropriate for the character. These details can further bring the character to life.
In terms of placement, consider positioning the hooked nose between the eyes and above the mouth. Experiment with different placements to achieve a more exaggerated or stylized look.
By understanding these aspects and incorporating them into your drawing, you can confidently create a hooked nose that captures the desired character traits and brings your cartoon to life.
6. Bulbous Nose
A bulbous nose, which is a round and full nose shape, can be drawn in a cartoon using the following techniques:
– Start by sketching a basic egg shape to outline the nose.
– Use curved lines to accentuate the roundness of the nose.
– Incorporate shading and highlights to add dimension and depth.
– Consider adding additional details such as flared nostrils or wrinkles.
– Keep the overall proportions and expressions of the face in mind to maintain balance.
By practicing and experimenting, you can create various bulbous noses that will give your cartoon characters unique traits. To improve your skills, draw inspiration from accomplished artists like Alison Beere and Takahiro Kimura who have mastered the art of drawing cartoon noses.
Enjoy the process of exploring cartoon noses and let your creativity soar!
7. Snub Nose
The “7. Snub Nose” in cartoon nose drawing has the following features:
| Feature | Description |
|---|---|
| Shape | A snub nose is short with a rounded tip. It has a small, curved bridge and a button-like appearance. |
| Placement | The snub nose is positioned in the center of the face, below the forehead and between the eyes. It is slightly elevated. |
| Proportions | The snub nose is relatively small compared to other nose shapes, taking up a modest amount of space on the face. |
| Details | Snub noses typically have minimal details, with a smooth and simplified contour. The nostrils may be small and subtle. |
| Expression | The snub nose can convey cuteness, innocence, or playfulness. It is often used for characters with a youthful or comedic nature. |
| Variations | Snub noses can vary in size, curve, and roundness while maintaining the basic structure. |
| Examples | Cartoon characters like Betty Boop and Hello Kitty have snub noses, showcasing their adorable and charming qualities. |
To draw a snub nose, keep the shape small and rounded, and pay attention to the placement and proportion on the face. Add minimal details and use gentle curves to create the desired effect. Experiment with different variations to bring uniqueness to your cartoon characters.
Tips and Techniques for Drawing Cartoon Noses
Discover exciting tips and techniques for drawing captivating cartoon noses! Unlock your artistic potential as we delve into the art of creating unique and eye-catching nose designs. Get ready to explore the fascinating world of line thickness and style experimentation, and learn how to bring your cartoon noses to life with intricate details and masterful use of shadows. Get your pencils ready, because we’re about to dive into an adventure of creativity and imagination!
Experimenting with Line Thickness and Style
Experimenting with line thickness and style is crucial in the process of drawing cartoon noses. It offers artists the opportunity to craft visually engaging characters. When engaging in this experimentation, it is important to follow these steps:
1. Utilize various pen or brush sizes to diversify line thickness. By incorporating thicker lines, you can outline the nose’s shape or emphasize specific areas.
2. Employ different line styles, including straight, curved, or zigzag lines, to introduce texture and dimension to the nose. This will result in visual effects that make the nose stand out.
3. Explore shading techniques such as hatching, cross-hatching, or stippling to infuse depth and volume into the nose. These techniques produce various textures and tones.
4. Consider the usage of diverse colors or patterns to fill the nose. This addition will create visual interest and enhance the overall design of the cartoon character.
5. Ensure that the line thickness and style harmonize with the drawing’s overall style. Maintaining consistency in line work will contribute to a unified and visually appealing composition.
Through the process of experimenting with line thickness and style, you can generate exceptional and captivating cartoon noses that truly bring your characters to life.
Adding Details and Shadows
To incorporate adding details and shadows into your cartoon nose drawings, follow these steps:
- Determine the light source in your drawing to identify where shadows should fall on the nose.
- Using light, gentle strokes, add small details such as nostrils, wrinkles, or creases to create depth and texture.
- Create shadows by darkening areas away from the light source. Shade the sides of the nose, area underneath the nose, and area between the nose and upper lip.
- For a gradual transition between highlighted and shaded areas, softly blend the shadows using a blending tool or smudging technique.
- Make your drawing more realistic and reflective by adding highlights to areas that catch the most light, such as the tip or bridge of the nose.
Observe real-life references and study how light and shadow interact with different nose shapes. Practice these steps and experiment with different techniques to develop your own unique style of adding details and shadows to your cartoon nose drawings.
Some Facts About How To Draw Different Cartoon Noses:
- ✅ Drawing cartoon noses can be easier than drawing naturalistic noses. (Source: TheDrawingWebsite)
- ✅ Cartoon noses can be any shape and size, providing flexibility in the drawing process. (Source: TheDrawingWebsite)
- ✅ There are different nose formulas used by cartoon artists such as the modified box shape, modified ball shape, and Kirby nose. (Source: Cartoon Nose Formulas)
- ✅ References and experimentation are important when drawing cartoon noses to understand shapes, proportions, and depth. (Source: Design Tutsplus)
- ✅ Exaggeration and artistic interpretation play a role in creating unique and expressive cartoon noses. (Source: Design Tutsplus)
Frequently Asked Questions
How do you draw different cartoon noses in a stylized manner?
To draw different cartoon noses in a stylized manner, you can start by understanding the basic construction of the nose and experimenting with different styles. Use references for inspiration and guidance, even in stylized drawings. Divide the nose into the bridge, ball, and nostrils, observing their shapes and proportions from different perspectives. Consider depth, planes, and variations in shape and size. Simplify features, including the nose, and experiment with contours and omissions. Exaggeration and artistic interpretation can accentuate features or push expressions further in cartoon noses.
What are some popular cartoon nose formulas used by different artists?
Different artists use various nose formulas in their cartoon illustrations. Bruce Timm, for example, uses the “Kirby nose” and a hook nose for his characters. Freddy Moore’s nose formula involves a modified ball or egg shape, while Takahiro Kimura’s anime style includes simple and sometimes structure-less noses. Dan DeCarlo’s style also influences Bruce Timm’s female noses, which are often less varied. Mixing and experimenting with these formulas can help create your own unique cartoon nose designs.
How can I draw a realistic-looking cartoon nose from a side view?
To draw a realistic-looking cartoon nose from a side view, start with a modified cube shape for the base, adding a wedge at the bottom and flared sides. These shapes will give the nose a natural appearance. Consider the general proportions of the nose, positioning it about two-thirds of the way down the face. Take into account the depth and planes of different regions and use references to understand variations. Experiment with the nose’s shape and size, and add details such as distinct nostril shapes to enhance realism.
How can I add personality and uniqueness to my cartoon noses?
To add personality and uniqueness to your cartoon noses, you can try different variations and personalizations. Change the shape, size, and color of the nose. Consider adding extra details such as moles or accessories like a nose ring. You can also turn the nose into a cartoon character by adding cartoony eyes, limbs, and props. Consider drawing the rest of the face or creating a caricature version of a real person. Experiment with individual aspects of the nose to make it stand out and reflect the character’s personality.
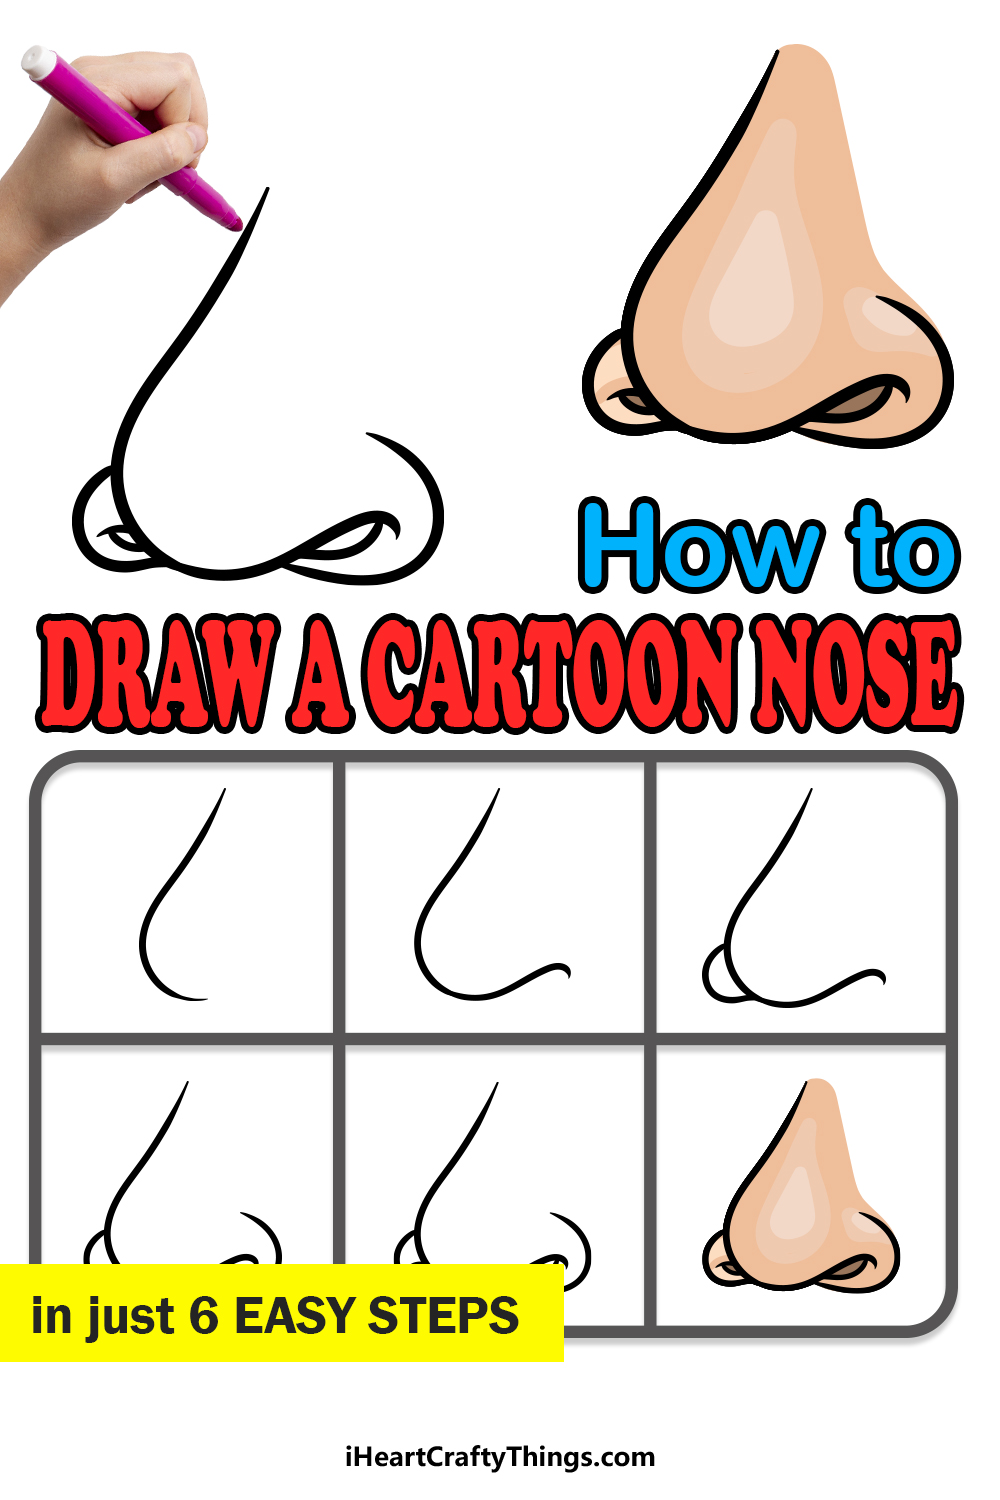
Is there a step-by-step guide to drawing a cartoon nose?
Yes, there is a step-by-step guide available for drawing a cartoon nose. Start by drawing a curved line for the bridge and tip of the nose. Then, add another line to form the base of the nose and extend into the start of the nostril on the right. Add the outline for the nostril on the left and the outline of the other nostril. Create the nostril holes by adding curved lines underneath the nostrils. Add color to the drawing, using shading and different shades to create a three-dimensional effect. The guide also suggests trying different variations and personalizations to enhance the cartoon nose.
How can I improve my cartoon nose drawing skills?
To improve your cartoon nose drawing skills, there are several resources and techniques you can explore. Use reference materials and tutorials to learn different styles and techniques. Practice drawing cartoon noses from different perspectives and angles. Experiment with different shapes, sizes, and details to develop your own unique style. Share your drawings on social media to receive feedback and learn from other artists. Consider taking courses or workshops on character design and animation to further improve your skills.