Last Updated on July 28, 2023 by Francis
.jpg)
Drawing a skeleton hand may seem daunting at first, but with the right techniques and approach, it can be made easy and accessible for anyone. Whether you are an aspiring artist or simply looking to try your hand at drawing, this step-by-step guide will help you create a realistic and anatomically accurate skeleton hand drawing.
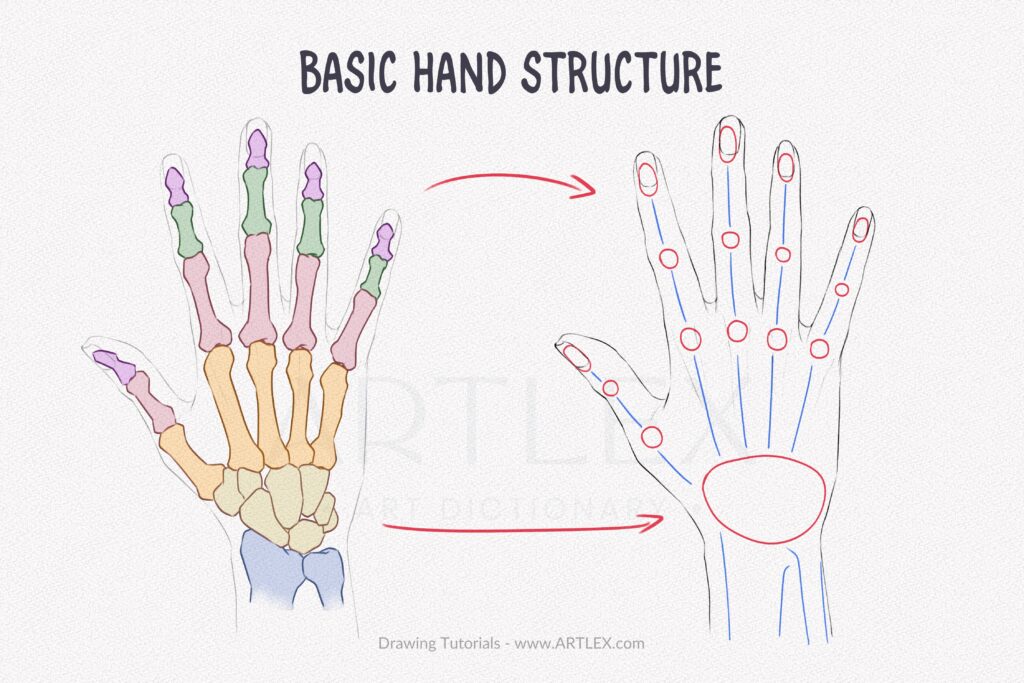
Understanding the anatomy of a skeleton hand is crucial for a successful drawing. By familiarizing yourself with the key bones and joints in the hand, you will have a better understanding of how the hand is structured and be able to accurately depict it in your drawing.
To begin your drawing, you will need some basic materials such as a pencil, eraser, and paper. These simple tools are all you need to bring your skeleton hand to life on the page.
The step-by-step guide provided will walk you through the process of drawing a skeleton hand in a clear and concise manner. From drawing basic shapes to outlining the bones and adding details and shadows, each step will build upon the previous one, resulting in a finished skeleton hand drawing.
Along the way, you will find some helpful tips to make the drawing process easier. Using reference images to guide your drawing, breaking down the hand into simple shapes, and focusing on light and shadow are all valuable techniques that will enhance the realism and accuracy of your skeleton hand drawing.
It’s important to be mindful of common mistakes that can occur when drawing a skeleton hand. By being aware of these pitfalls and avoiding them, you can ensure that your drawing turns out as intended and showcases your artistic skills effectively.
With this comprehensive guide, you will be equipped with the knowledge and tools needed to confidently draw a skeleton hand with ease. So grab your drawing materials and get ready to bring a touch of the macabre to your artwork!
Contents
Key takeaway:
- Drawing a skeleton hand can be made easy by breaking it down into simple shapes: By starting with basic shapes, such as rectangles and circles, it becomes easier to build the structure of the skeleton hand.
- Understanding the anatomy of a skeleton hand is crucial: Familiarizing oneself with the key bones and joints in the hand helps in accurately depicting the structure and proportions in the drawing.
- Adding details and shadows enhances the realism of a skeleton hand drawing: By paying attention to the smallest details and utilizing shading techniques, the drawing can look more 3-dimensional and lifelike.
Understanding the Anatomy of a Skeleton Hand
Let’s take a fascinating journey into the inner workings of a skeleton hand. In this exploration, we’ll uncover the secrets behind the anatomy of a skeleton hand, starting with a focus on the key bones and joints that make up this intricate structure. Get ready to discover the intricate design and functionality of the skeletal system, as we delve into the intricate details of the hand’s skeletal framework.
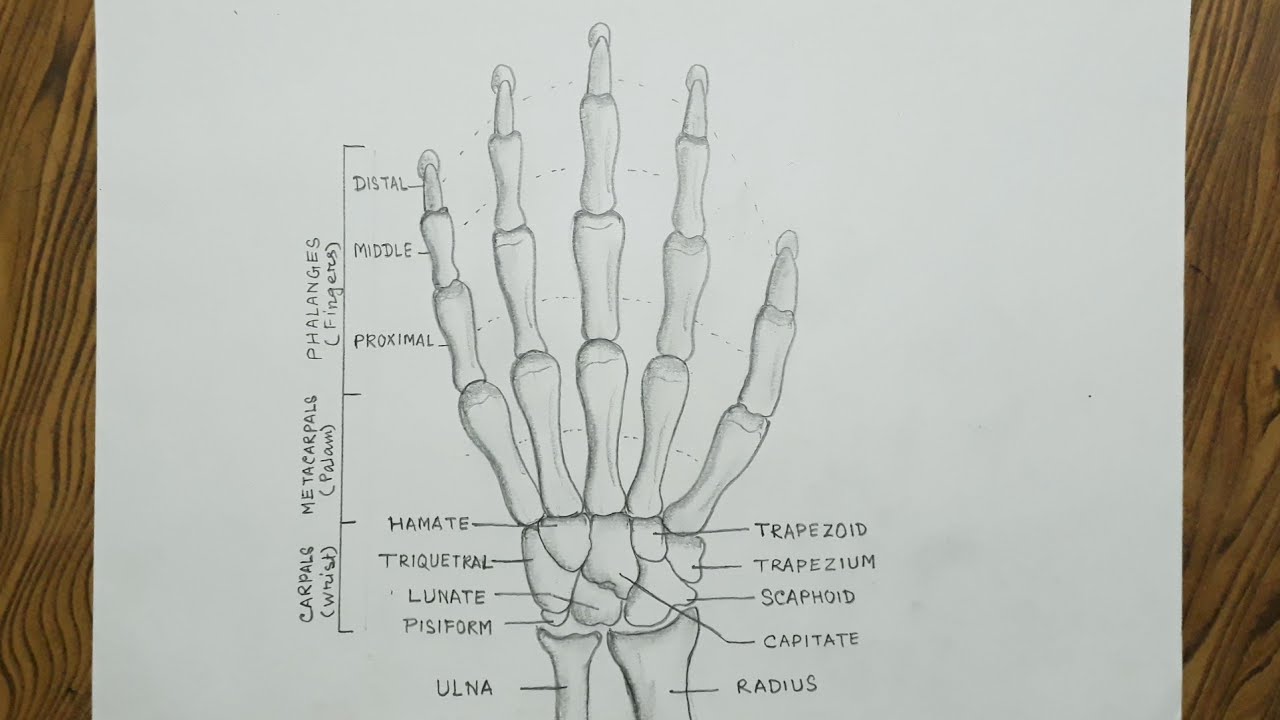
Key Bones and Joints in the Hand
| Key Bones | Joints |
| Metacarpals | Carpometacarpal joints |
| Phalanges | Metacarpophalangeal joints |
| Proximal phalanges | Proximal interphalangeal joints |
| Intermediate phalanges | Distal interphalangeal joints |
| Distal phalanges | |
| Thumb metacarpal | Thumb carpometacarpal joint |
The hand has key bones such as metacarpals, phalanges, proximal phalanges, intermediate phalanges, distal phalanges, and the thumb metacarpal. These bones provide support and flexibility to the hand.
The hand also has joints like carpometacarpal joints, metacarpophalangeal joints, proximal interphalangeal joints, and distal interphalangeal joints. These joints enable movement and articulation between the bones.
Materials Needed for Drawing a Skeleton Hand
To draw a skeleton hand, you will need the following materials:
– Pencil: For sketching the basic outline of the skeleton hand.
– Eraser: To correct any mistakes and refine the drawing.
– Paper: To provide a surface for drawing the skeleton hand.
– Ruler: For creating straight and precise lines, if needed.
– Reference Image: To have a visual guide for the anatomy and details of a skeleton hand.
– Black Ink Pen: To outline and add final details to the skeleton hand drawing.
– Shading Tools (optional): Such as charcoal or graphite pencils, for adding depth and shading to the skeleton hand.
– Colored Pencils or Markers (optional): To add color and bring the skeleton hand drawing to life.
– Blending Stumps or Cotton Swabs (optional): For blending and smudging shading techniques.
– Fixative Spray (optional): To set the drawing and prevent smudging.
These materials are essential for creating a detailed and accurate representation of a skeleton hand. Make sure you have all the necessary tools to achieve your desired outcome.
Step-by-Step Guide: How to Draw a Skeleton Hand
Get ready to unleash your artistic talents with our step-by-step guide on drawing a skeleton hand! We’ll take you through the process of creating a realistic depiction of this hauntingly beautiful subject. From sketching the basic shapes to adding intricate details and shadows, you’ll be able to bring your drawing to life. Say goodbye to confusing tutorials and hello to a straightforward approach that will have you mastering the art of drawing a skeleton hand in no time!
Step 1: Draw Basic Shapes
To draw a skeleton hand, start with basic shapes before adding details and shadows. Follow these
- Draw a rectangular shape for the palm.
- Draw five elongated oval shapes evenly spaced along the top edge of the palm for the fingers.
- Draw a smaller oval shape slightly below the other fingers for the thumb.
- Connect the fingers to the palm with short lines.
- Draw a slightly curved horizontal line below the palm for the wrist.
By following these Step 1: Draw Basic Shapes, you can create the foundation of a skeleton hand. Then, outline the bones, add details and shadows, and refine the drawing.
Drawing a skeleton hand may seem challenging, but breaking it down into simple shapes makes the process easier. Grab your pencil and paper and let’s get started on creating an anatomically accurate skeleton hand.
Historically, the study of human anatomy, including the skeletal system, dates back to ancient civilizations like the Egyptians and Greeks. These civilizations recognized the importance of understanding the human body and used their knowledge to advance medical practices. Today, anatomy plays a crucial role in various fields, including art, medicine, and scientific research.
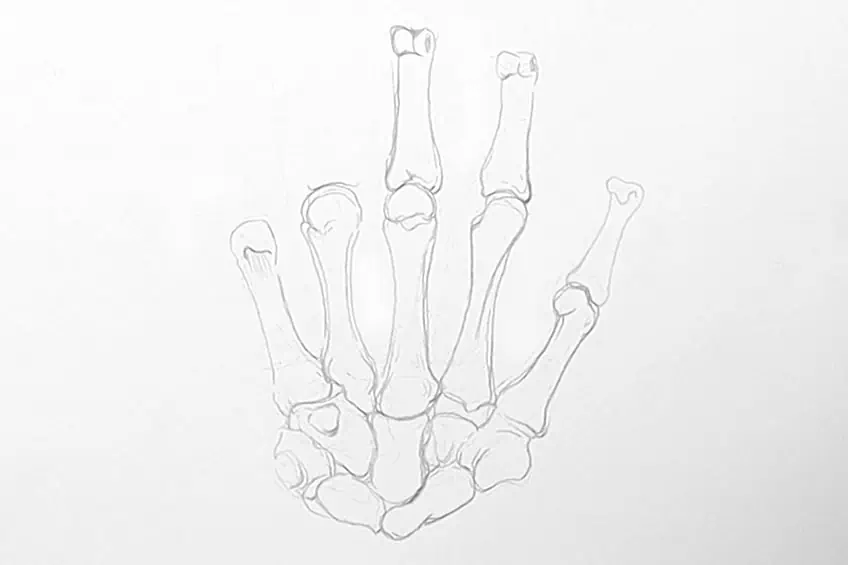
Step 2: Outline the Bones
- Sketch the hand shape using basic shapes like circles, ovals, and rectangles to represent the palm, fingers, and thumb.
- Identify the main bones in the hand, such as the metacarpal bones and phalanges. Use straight lines to outline the shape and position of each bone.
- Add more bone details, like knuckles and joints, using curved lines to show the contours and curves.
- Pay attention to the finger joints, including the distal interphalangeal joint, proximal interphalangeal joint, and metacarpophalangeal joint. Draw these joints as small bends or curves in the bone outlines.
- Include additional details like the pisiform bone or the sesamoid bones in the thumb. Represent them with small circles or ovals.
- Refine the bone outlines, making them more defined and accurate. Use darker lines to emphasize the shape and structure.
- Erase unnecessary guidelines or shapes, leaving only the clear bone outline.
- Review your drawing and make necessary adjustments or corrections for accuracy.
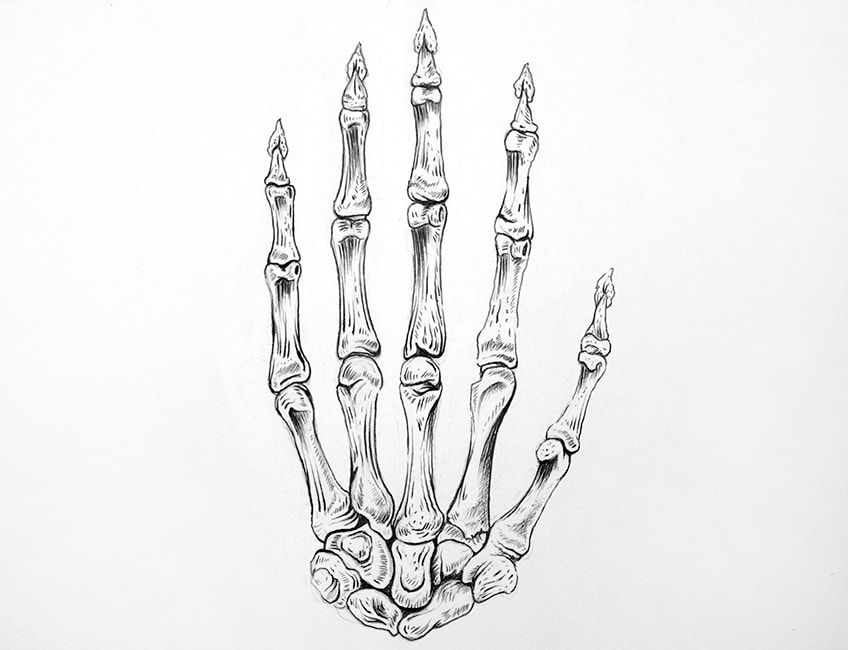
Step 3: Add Details and Shadows
Edited
Step 3: Add Details and Shadows
To add details and shadows to a drawing of a skeleton hand, follow these steps:
1. Observe the reference image or your own hand to see where the shadows fall. Take note of the angles and curves of the bones.
2. Use a fine-tipped pen or pencil to outline the individual bones in the hand. Pay attention to the joints and how they connect the bones.
3. Add details to the bones, such as lines to represent ridges and texture. Keep the lines parallel to the shape of the bones for a realistic effect.
4. Identify the areas where shadows would naturally occur. Shadows are found in the crevices between bones and where bones overlap. Use cross-hatching or shading techniques for depth.
5. Gradually build up the shadows, starting with lighter strokes and increasing darkness. This creates a gradual transition from light to shadow.
6. Blend the shadows using a blending stump or soft brush for a smoother and more realistic appearance.
7. Refine and add details as needed. Look for areas where highlights may be present, such as bony protrusions or surfaces where light reflects.
8. Step back and observe the drawing from a distance to ensure balanced and accurate details and shadows.
9. Optional: Use a white gel pen or white colored pencil to add highlights and enhance contrast between light and shadow.
Throughout art history, techniques for adding details and shadows have evolved. Artists have experimented with mediums like charcoal, ink, and graphite to bring depth and realism to their drawings. Shadows and details are crucial for conveying the form and structure of the subject. From cave paintings to Renaissance masters, artists have explored different methods to capture the intricate details and nuances of the human hand. By skillfully adding details and shadows, artists can create compelling and lifelike representations of the skeleton hand.
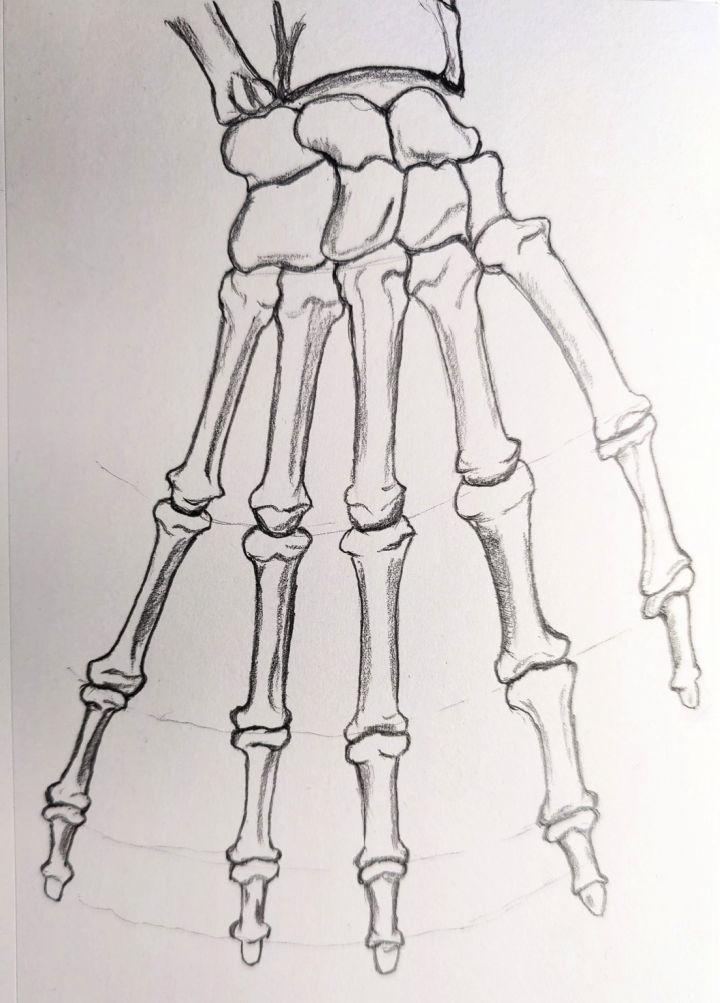
Step 4: Erase Guidelines and Refine the Drawing
To refine your skeleton hand drawing, follow these steps:
Step 4: Erase Guidelines and Refine the Drawing
1. Erase guidelines: Use an eraser to remove construction lines or guidelines no longer needed. This will clean up the drawing.
2. Refine shapes: Examine the hand’s skeletal structure and make necessary adjustments to bone shape and size. Pay attention to proportions and angles.
3. Add details: Incorporate small details like joint and crease lines to make the bones appear more realistic and three-dimensional.
4. Enhance shading: Use shading techniques to add depth and volume to the bones. Consider the light source and add shadows accordingly for a realistic appearance.
Pro-tip: Take your time and be patient. Small adjustments and fine details can significantly impact the final result.
I. Introduction to Drawing Skeleton Hands
Importance of learning how to draw skeleton hands
Drawing skeleton hands can be a challenging task, but it is essential for artists who want to create realistic and detailed artwork. Understanding the structure and anatomy of the hand is crucial for capturing its intricate movements and gestures accurately. Whether you are an aspiring artist or simply enjoy drawing as a hobby, learning how to draw skeleton hands will greatly enhance your skills and allow you to create more dynamic and expressive artwork.
Basic guidelines for drawing skeleton hands
1. Understanding the bone structure: Skeleton hands are composed of various bones that connect and interact to create movement. It is crucial to study the anatomy of the hand and familiarize yourself with the bones, such as the metacarpals, phalanges, and carpals. This knowledge will help you accurately depict the proportions and positions of the hand bones in your drawings.
2. Start with basic shapes: When drawing skeleton hands, it can be helpful to begin by sketching basic shapes to establish the overall structure. Start with a rough outline of the palm and fingers using simple shapes like cylinders and rectangles. This technique will act as a foundation for adding details and refining the hand’s form.
3. Pay attention to joint placement: Joints are essential for the hand’s flexibility and movement. To make your drawing appear more realistic, pay close attention to the placement of joints, such as the knuckles and wrist. These areas will significantly impact the overall pose and gesture of the hand.
4. Observe and study real-life hands: To improve your accuracy and understanding of how skeleton hands work, take the time to observe and study real-life hands. Look at your own hands or use reference images to analyze the bone structure and how the hand moves and flexes. This observation will help you capture the nuances and details required for a realistic drawing.
Drawing skeleton hands may seem daunting at first, but with practice and patience, you can develop the skills necessary to create lifelike representations. Remember to start with the basics, study the bone structure, and observe real-life hands to enhance your understanding and expertise. By mastering the art of drawing skeleton hands, you will be capable of adding depth and realism to your artwork. So grab your pencils and start sketching!
Step-by-Step Tutorial: Drawing a Skeleton Hand
Drawing a skeleton hand may seem intimidating, but with a step-by-step guide, it can be easy and fun. Follow these steps to create your own spooky skeleton hand drawing.
Step 1: Sketching the basic shape of the hand
Start by sketching the basic shape of the hand using simple geometric shapes. Draw an oval for the palm and longer, curved rectangles for the fingers. Don’t worry about details at this stage; focus on getting the proportions right.
Step 2: Adding the bones to the hand
Now, it’s time to add the bones to the hand. Draw thin, curved lines for the phalanges (finger bones) and metacarpals (hand bones). Remember that the bones are connected in a specific way, so pay attention to how they align with each other.
Step 3: Refining the details of the skeleton hand
Refine the shape of the hand by adding more curves and contours. Pay attention to the joints and knuckles, as they are essential for creating a realistic-looking skeleton hand. Erase any unnecessary guidelines from the previous steps.
Step 4: Adding shading and texture
To give your skeleton hand depth and dimension, add shading and texture. Use hatching and cross-hatching techniques to indicate where light and shadows fall. You can also add some bone texture by creating light, parallel lines on the bones.
Here are some tips to keep in mind while drawing a skeleton hand:
- Use references: Look at images of real skeleton hands or reference drawings to understand the anatomy and details better.
- Practice anatomy: Familiarize yourself with the structure of the hand, including the different bones and joints.
- Experiment with different poses: Don’t limit yourself to a basic hand pose; try drawing the hand in various positions to challenge yourself.
- Take breaks: Drawing detailed anatomy can be time-consuming and mentally taxing. Take breaks to rest your eyes and hand.
Remember, drawing is a practice, and it takes time to improve. Don’t be too hard on yourself if your first attempt doesn’t turn out perfect. Keep practicing, experimenting, and have fun with it!
Now that you have the steps, grab a pencil, and start creating your own spooky skeleton hand drawing. Happy drawing!
III. Tips and Tricks for Drawing Skeleton Hands
When it comes to drawing a skeleton hand, there are a few tips and tricks that can help you achieve realistic and easy results. Follow these steps to bring your skeleton hand drawings to life:
Understanding the bone structure
To accurately draw a skeleton hand, it’s essential to have a basic understanding of the bone structure. Research and familiarize yourself with the anatomy of the hand, including the phalanges, metacarpals, and carpals. Understanding how these bones connect and move will help you create a more realistic and accurate drawing.
Mastering the proportions and angles
Proportions and angles play a crucial role in creating a realistic skeleton hand drawing. Pay close attention to the length and width of each bone segment, as well as the angles at which they connect. Use references, such as images or even your own hand, to help you visualize and understand the proportions and angles better.
Using references and practice exercises
References are an invaluable tool when it comes to drawing a skeleton hand. Look for high-quality images or even 3D models of a skeleton hand to use as a reference. Study the shadows, lines, and details of the bones to capture their intricacies accurately.
Practice exercises can also help you improve your skeleton hand drawing skills. Start by sketching simple shapes to represent each bone segment and gradually add details. Experiment with different hand poses and angles to enhance your understanding of the bone structure and improve your overall drawing technique.
Remember, practice makes perfect, so don’t be discouraged if your initial attempts don’t turn out exactly as you envisioned. Keep practicing and refining your skills, and over time, you’ll see improvement in your skeleton hand drawings.
By following these tips and tricks, you’ll be able to draw a skeleton hand easily and with confidence. Remember to take your time, be patient with yourself, and most importantly, have fun experimenting with different techniques. Happy drawing!
Common Mistakes to Avoid When Drawing Skeleton Hands
When it comes to drawing a skeleton hand, there are a few common mistakes that beginners often make. By being aware of these errors and avoiding them, you can create a more realistic and visually appealing representation. Here are some mistakes to avoid when drawing skeleton hands:
Misplacing the bones or fingers
One common mistake is misplacing the bones or fingers in the hand. It’s essential to have a basic understanding of the hand’s anatomy and the positioning of the bones. Remember that the fingers are made up of three bones, except for the thumb, which has only two. Take reference from images or a model to ensure accurate placement.
Overcomplicating the hand’s anatomy
Another mistake to avoid is overcomplicating the hand’s anatomy. While it’s important to capture the bone structure and joints, it’s equally crucial not to get too caught up in intricate details. Simplify the shapes and lines to make the drawing more manageable. Focus on the major bones and key features of the hand such as the knuckles and wrist bones.
Neglecting to add proper shading
A common mistake in drawing skeleton hands is neglecting to add proper shading. Shading is essential to create depth and give a three-dimensional appearance to the hand. Use different tones of gray to add shadows and highlights to the bones and joints. This will give your drawing more realism and make it stand out.
To improve your drawing skills and create a more accurate representation of a skeleton hand, it can be helpful to study the anatomy of the hand in more detail. Explore resources such as anatomy books or online references, like Wikipedia’s article on skeleton hands. Practice drawing the hand from different angles and in various poses to strengthen your understanding of its structure.
By avoiding these common mistakes and continuously practicing, you’ll be on your way to drawing realistic and impressive skeleton hands. Remember to be patient with yourself and enjoy the journey of improving your drawing skills.
V. Alternative Approaches to Drawing Skeleton Hands
When it comes to drawing a skeleton hand, there are alternative approaches that you can explore to achieve different styles and effects. Whether you want to create a simplified or cartoonish look, incorporate elements of fantasy or horror, or experiment with different mediums and techniques, there are various ways to make the process easier and more enjoyable.
1. Using a simplified or cartoonish style
If you prefer a simplified or cartoonish style, you can break down the structure of the hand into basic shapes and lines. Start by sketching a rectangle for the palm and elongated ovals for the fingers. Then, add ovals or circles at the joints to represent the knuckles. Simplify the bones by using straight lines or curves to connect the joints. Remember to add details such as small circles for the fingertips to give the hand a more skeletal appearance.
2. Incorporating elements of fantasy or horror
To add a touch of fantasy or horror to your skeleton hand drawing, you can experiment with exaggerated proportions and eerie details. Play with the size of the bones to create a more stylized and dramatic effect. Consider adding texture and shading techniques, such as cross-hatching or stippling, to enhance the skeletal appearance. You can also incorporate elements like spiderwebs, cracks, or creepy accessories to give your drawing a unique twist.
3. Experimenting with different mediums and techniques
Drawing a skeleton hand can also be a great opportunity to explore different mediums and techniques. If you enjoy working with pencils, try using different grades to create depth and shading. Experiment with ink or watercolors to add a dynamic element to your drawing. You can also try using digital tools, such as graphic tablets or illustration software, to experiment with effects, colors, and textures.
Remember to have fun and embrace your creativity while exploring these alternative approaches. Every artist has their own unique style, so don’t be afraid to experiment and make the drawing your own.
Whether you choose a simplified or cartoonish style, incorporate fantasy or horror elements, or experiment with different mediums and techniques, drawing a skeleton hand can be a fun and rewarding artistic endeavor. So grab your pencil, ink, or tablet and start exploring the fascinating world of skeletal anatomy and art.

VI. Drawing Apps and Tools for Creating Skeleton Hand Artwork
If you’re interested in creating skeleton hand artwork, there are several digital drawing applications and traditional tools that can help you bring your ideas to life. Whether you prefer the convenience of digital drawing or the feel of traditional tools, here are some options to consider:
Digital drawing applications for skeleton hand illustrations
Procreate: Procreate is a popular digital drawing app available for iPad users. It offers a wide range of tools and brushes that can be used to create detailed and realistic skeleton hand illustrations. With its intuitive interface and powerful features, Procreate is a favorite among professional artists.
Adobe Photoshop: Adobe Photoshop is a versatile software that many artists use for digital drawing and editing. It offers a variety of tools and customizable brushes that can help you create intricate and dynamic skeleton hand illustrations. Photoshop’s layering system also allows for easy adjustments and experimentation.
Krita: Krita is a free and open-source digital drawing software that is suitable for artists of all levels. It offers a wide range of brushes and customizable features that make it ideal for creating skeleton hand artwork. Krita also supports animation, making it a versatile option for creating dynamic illustrations.
Traditional tools for sketching and inking skeleton hands
Pencils: Sketching pencils with varying degrees of hardness are essential for creating the initial outlines and shading of skeleton hand artwork. A softer pencil, such as a 2B or 4B, can be used for darker and more detailed areas, while a harder pencil, such as an HB or 2H, can be used for lighter areas and fine lines.
Inking pens: For clean and precise linework in skeleton hand illustrations, inking pens are a popular choice. Waterproof fineliners or technical pens with different nib sizes can be used to create varying line thicknesses and details. Experiment with different pens to find the one that works best for your desired style.
Markers: Markers can be used to add vibrant colors and shading to skeleton hand artwork. Alcohol-based markers, such as Copic or Prismacolor markers, are popular choices due to their blendability and wide range of colors. Water-based markers, such as Tombow or Winsor & Newton markers, can also be used for a different effect.
Whether you choose digital drawing applications or traditional tools, the key to creating impressive skeleton hand artwork is practice and experimentation. Take the time to explore different techniques and styles to find what works best for you. Remember, drawing is a journey, and every stroke brings you closer to your artistic goals.

VII. Inspiration and Examples of Skeleton Hand Artwork
Are you looking to learn how to draw a skeleton hand easily? Drawing skeleton hands can be a challenging task, but with some inspiration and examples, you can develop your skills and create impressive artwork. Here are a few talented artists and illustrators who specialize in skeleton hand drawings, showcasing different styles and interpretations that may inspire you to create your own unique artwork.
By exploring the artwork of these talented artists, you can gain insight into different techniques, styles, and interpretations of drawing skeleton hands. Whether you prefer realistic depictions or more abstract and stylized designs, there is a wealth of inspiration to be found.
Remember, learning to draw a skeleton hand easily takes practice and patience. Start by studying the basic structure and proportions of a human hand, understanding the placement and shapes of the bones. Then, experiment with different shading and detailing techniques to add depth and dimension to your drawings.
Don’t be afraid to try different styles and approaches, as this will help you develop your artistic voice and create your own unique artwork. Practice regularly, seek inspiration from other artists, and enjoy the process of honing your skills.
For further guidance and step-by-step tutorials, you may find helpful resources on websites dedicated to drawing tutorials or art communities like DeviantArt.
So, grab your pencils, erasers, and sketchbooks, and let your creativity flow as you embark on your journey to mastering the art of drawing a skeleton hand easily.

VIII. Conclusion
Drawing a skeleton hand may seem challenging at first, but with the right techniques and practice, it can be made easy. Here is a summary of the key points and techniques discussed in this article:
- Understanding the basic structure: Start by understanding the basic structure of a hand. Study the placement and arrangement of the bones, joints, and fingers.
- Simplify the shapes: Break down the hand into simple shapes and forms. Use circles and rectangles to represent the bones.
- Sketching the outline: Begin by lightly sketching the outline of the hand. Focus on the placement of the fingers, knuckles, and wrist.
- Adding the details: Once the outline is in place, start adding the details such as the individual bones, joints, and tendons. Pay attention to the proportions and angles.
- Emphasizing the skeletal structure: Use shading techniques to emphasize the skeletal structure of the hand. Add light and shadow to create depth and dimension.
- Refining the drawing: Take your time to refine the drawing by adding more details and making adjustments as needed. Use references or images of a skeleton hand if necessary.
Remember, practice is key when it comes to drawing. Don’t be discouraged if your first attempts don’t turn out as expected. Keep practicing and experimenting with different techniques until you achieve the desired result.
To further enhance your understanding and skills in drawing, you can explore online tutorials or resources like anatomy references for a more in-depth study of the hand’s skeletal structure.
With dedication and perseverance, drawing a skeleton hand can become easier and more enjoyable. So grab your pencil and start practicing today!
Tips for Easy Skeleton Hand Drawing
Looking to master the art of drawing a skeleton hand with ease? Look no further! In this section, we will uncover some valuable tips that will make your skeleton hand drawing process a breeze. From utilizing reference images to breaking it down into simple shapes and understanding the importance of light and shadow, these insights will surely elevate your skills and bring your skeleton hand drawings to life. So, grab your pencils and get ready to create some spooky masterpieces!
Use Reference Images
Edited
Use Reference Images
When learning to draw a skeleton hand, reference images are extremely helpful. Follow these steps to effectively utilize reference images:
1. Search for high-quality reference images: Look for images that clearly show the bones and joints of a skeleton hand. You can find these images on websites, in anatomy books, or by using 3D modeling software.
2. Analyze the reference image: Observe the placement and proportions of the bones. Pay attention to the shape and size of each bone, as well as any distinct features or angles.
3. Break down the image into simple shapes: Sketch basic shapes that represent each bone of the hand. Use the reference image to guide you in placing the shapes correctly.
4. Compare your drawing to the reference image: Continuously refer back to the reference image while drawing to ensure accuracy. Compare the placement and proportions of your shapes to those in the reference image, making adjustments as needed.
5. Pay attention to details: Look closely at the reference image for bumps, ridges, or curves that you can incorporate into your drawing. Adding these details will make your skeleton hand more realistic.
6. Use shading and highlights: Observe how light interacts with the bones in the reference image. Add shadows and highlights to your drawing to create depth and dimension, making your skeleton hand more lifelike.
By using reference images, you can improve the accuracy and realism of your skeleton hand drawing. Remember to practice and experiment with different techniques to enhance your artistic skills.
Break it Down into Simple Shapes
To create a drawing of a skeleton hand, you can follow these steps that break it down into simple shapes:
- Begin by sketching a rectangular shape to represent the palm of the hand.
- Place smaller rectangles on top of the palm to indicate the bones of the fingers.
- Connect the top of each finger bone with a curved line to outline the shape of the fingers.
- Draw small ovals at the ends of each finger bone to represent the joints.
- Illustrate a curved line above the palm to depict the thumb bone. Connect this line to the palm using a curved line to show the thumb joint.
- Add curved lines inside the fingers and thumb to represent the bones within.
- Incorporate additional details and shading to give the hand a three-dimensional appearance.
- Erase any unnecessary guidelines to refine the overall drawing.
By breaking it down into simple shapes, this approach helps you grasp the fundamental structure of a skeleton hand and enables you to accurately depict the proportions and angles in your artwork.
Throughout history, the study of human anatomy and the visual representation of the human body in art have been closely connected. Artists from different eras have utilized the technique of breaking down complex forms into simple shapes. This method allows them to accurately depict the intricate structure of the skeleton hand. It has proven valuable in both scientific illustrations and various artistic creations.
Focus on Light and Shadow
When drawing a skeleton hand, it is important to focus on light and shadow in order to achieve depth and realism. The contrast between light and shadow is what defines the shape and form of the bones. In your composition, be sure to identify the light source, as this will help you determine where the highlights and shadows should be placed. Pay close attention to the angles and curves of the bones, as these will dictate how the light is cast and where the shadows are formed.
To add depth to your drawing, utilize shading techniques. Apply darker tones to the shadowed areas and lighter tones to the areas that are directly hit by the light. Gradually build up layers of shading to create a three-dimensional effect.
Keep in mind that the positioning of the hand and the angle of the light source can greatly affect the way light and shadow appear. To better understand how light behaves on a skeleton hand, consider studying reference images.
It is interesting to note that artists have been using the study of light and shadow, known as chiaroscuro, for centuries in order to create dramatic and realistic effects in their artwork.
Common Mistakes to Avoid
- Rushing the process: Avoid the common mistake of rushing when drawing a skeleton hand. Take time to observe proportions and details accurately for a realistic result.
- Skipping the foundation: Neglecting the basic shapes and structures of the hand is a common mistake to avoid. Start by sketching main shapes and lines to establish the hand’s pose and structure.
- Neglecting reference material: Using reference material is an important step to avoid common inaccuracies and inconsistencies. Look at photos or real-life examples of skeleton hands to understand bone structure and finger placement.
- Overcomplicating details: Find a balance between capturing essential details and overwhelming the drawing with complexity. Start with basic shapes and gradually add more intricate details to avoid this common mistake.
- Ignoring shading and texture: Don’t neglect shading and texture as it can result in a flat and unrealistic drawing. Pay attention to shadows and highlights on the bones to add depth and dimension to the hand and avoid this common mistake.
Some Facts About How To Draw a Skeleton Hand Easy:
- ✅ Drawing a skeleton hand can add a creepy or macabre touch to your artwork, making it suitable for horror or gothic themes.
- ✅ You don’t need to be an experienced artist to draw a skeleton hand. This tutorial is suitable for both beginners and experienced artists.
- ✅ To draw a skeleton hand, you will need materials such as a piece of paper, a graphite pencil, a blending stump, an eraser, and a Tombow Mono Zero 2.3mm.
- ✅ The tutorial will guide you through the structure and anatomy of a hand, including the different bones that make up the hand.
- ✅ The tutorial provides step-by-step instructions for drawing and shading the bones of the hand, allowing you to create a realistic and convincing skeleton hand in your artwork.
Frequently Asked Questions
How do you draw a skeleton hand using simple techniques?
To draw a skeleton hand using simple techniques, start by sketching the basic structure and anatomy of a hand. Use a 2H graphite pencil to create a rough outline of the wrist, fingers, and thumb. Then, use a blob-like shape to represent the carpals and lines to represent the metacarpals. This simplification will make it easier to draw different hand poses.
Next, use a 6B graphite pencil to draw and shade the bones of the hand. Begin with the distal phalanges, then move on to the middle phalanges, proximal phalanges, metacarpals, and carpal bones. Add details and shading to create a more realistic effect.
Remember to practice and experiment with different techniques to improve your drawing skills over time.
What materials do I need to draw a skeleton hand?
To draw a skeleton hand, you will need the following materials:
- A piece of paper
- A 2H graphite pencil
- A 6B graphite pencil
- A blending stump
- An eraser or kneaded eraser
- A Tombow Mono Zero 2.3mm
How can I add a creepy or macabre touch to a skeleton hand drawing?
To add a creepy or macabre touch to your skeleton hand drawing, you can incorporate elements of horror art or gothic flair. This involves emphasizing shadows and creating a dark and eerie atmosphere. Consider adding dramatic lighting, such as using strong contrast between light and dark areas. You can also add intricate details, like cracks in the bones or skeletal decay, to enhance the eerie effect.
Can beginners draw a skeleton hand following this tutorial?
Absolutely! This tutorial is suitable for both beginners and experienced artists. It provides step-by-step instructions and easy-to-follow techniques, making it accessible for anyone who wants to learn how to draw a skeleton hand. With practice, beginners can gradually improve their skills and create impressive Halloween-themed pictures with a gothic touch.
Where can I find more resources to enhance my drawing skills?
If you’re looking to enhance your drawing skills, YouTube offers various tutorials and resources for aspiring artists. You can check out YouTube’s creator program, which provides tips, tutorials, and tools specifically tailored for content creators. YouTube offers the ability to test new features, allowing you to stay up-to-date with the latest tools and enhancements. Experimenting with new techniques and practicing regularly will help you develop your drawing abilities.
Yes, if you wish to cancel contracts or subscriptions related to YouTube services, you can follow the instructions provided in the “Verträge hier kündigen” section. This section likely provides detailed information or instructions on how to terminate or cancel your contracts or subscriptions. By following these guidelines, you can manage your YouTube services according to your preferences and needs.